What Is Local Recording & How's It Better Than Cloud-Based Recording?
Learn why local recording should always be your choice for podcasting & how to get the most out of it with Waveroom.

Recording technologies have undergone a remarkable evolution over the years, transforming the way we capture and preserve audio and video content. Historically, recording was primarily analogue, with devices like tape recorders and VCRs dominating the scene. These analogue methods relied on physical media such as magnetic tape to store audio and video signals.
Yet, the advent of digital recording revolutionised the industry, offering numerous advantages over analogue technologies. Digital recording allows for higher fidelity, greater flexibility, and easier manipulation of recorded content. It also enables seamless integration with computers and digital networks.
Today, digital recording is ubiquitous, with a wide range of devices and software solutions available to suit various needs and preferences. From professional-grade audio interfaces and video cameras to consumer-level smartphones and webcams, the options for capturing audio and video content are vast and diverse.
Moreover, the rise of digital platforms and online content creation has further fueled the demand for recording technologies. Podcasting, vlogging, live streaming, and video conferencing are just a few examples of the diverse applications of recording in the digital age.
All these generated the demand for local recording which became a critical component of modern recording workflows. Unlike cloud-based solutions that rely on remote servers and internet connectivity, local recording offers users the ability to capture and store content directly on their own devices or storage media.
What is local recording & how's it better than other recording types?
Local recording means that audio, video, or both, are captured directly onto a local storage device such as a computer's hard drive or an external storage device. This is typically done using hardware or software tools designed for recording. Local recording allows users to save content for future reference, editing, or sharing without relying on an internet connection or cloud-based services.
Local recording offers several advantages over other recording methods, cloud-based recording. Here they are.
Control
With local recording, you have full control over the recording process, including the quality settings, file formats, and storage location which is essential for achieving optimal results in various recording scenarios.
Every recording environment is unique, and different situations may require specific adjustments to achieve the desired outcome. With full control over recording settings, you can customise parameters such as audio bitrate, sample rate, video resolution, codec selection, and file format.
Privacy
Local recording keeps your data within your own physical possession or control. This can be important for sensitive or confidential recordings where you may not want to rely on third-party services or risk potential privacy breaches associated with cloud-based recording solutions.
When recordings are stored locally, you and you only retain full ownership and control over the data. Unlike cloud-based solutions where recordings may be stored on servers owned and managed by third-party providers, local recording ensures that users maintain sovereignty over their recorded content. This ownership gives users greater autonomy in determining how their recordings are accessed, shared, or deleted, enhancing privacy and data control.
Local recording also reduces the risk of unauthorised access to recorded content. Since recordings are stored within the user's own environment, access to the data is typically restricted to authorised individuals or devices.
Reliability
Local recording is generally more reliable than relying on internet connectivity for real-time recording or cloud-based storage. It reduces the risk of interruptions due to network issues or service outages, ensuring that your recordings are captured without any disruptions.
Since local recording typically involves capturing audio and video directly onto local storage devices such as hard drives, solid-state drives, or memory cards, this direct recording process minimises latency, or the delay between capturing the content and storing it, resulting in more immediate and responsive recording performance. By avoiding the need to transmit data over the internet to remote servers, local recording ensures minimal latency and smoother recording workflows.
Offline access
Once recorded locally, the files are immediately accessible on your device without the need for an internet connection, which is convenient for users who may need to access their recordings while offline or in areas with limited connectivity.
You can access your recordings anytime, anywhere, even in offline environments such as airplanes, remote locations, or areas with limited connectivity, so this availability ensures uninterrupted access to recorded content, enhancing convenience and flexibility in various situations.
Retrieving recordings stored locally typically involves faster access speeds compared to accessing recordings stored in the cloud over the internet. Since recordings are stored directly on the user's device or local storage media, there is no need to wait for data to be transmitted over the internet, resulting in quicker access times. This faster access speed improves efficiency and responsiveness when accessing recordings, allowing users to quickly find and playback the content they need without delay.
Multi-track recording
Many local recording solutions support multi-track recording, allowing users to capture multiple audio sources simultaneously on separate tracks, so you record individual audio channels independently, facilitating post-production editing, mixing, and mastering. Multi-track recording is particularly useful in music production, podcasting, and film production, where multiple audio sources need to be recorded and processed separately for optimal results.
Waveroom records your podcast or interview locally
If you're looking for a tool to record your show, voice-over, or interview locally, Waveroom is your best bet. Waveroom is our free online podcast recording studio that locally captures your audio and video as well as removes background noise to make your show sound just as crisp as you want it to. Here's how it works.
- Log in to your Waveroom account or create it if you don't have one.
- Click Create Room.
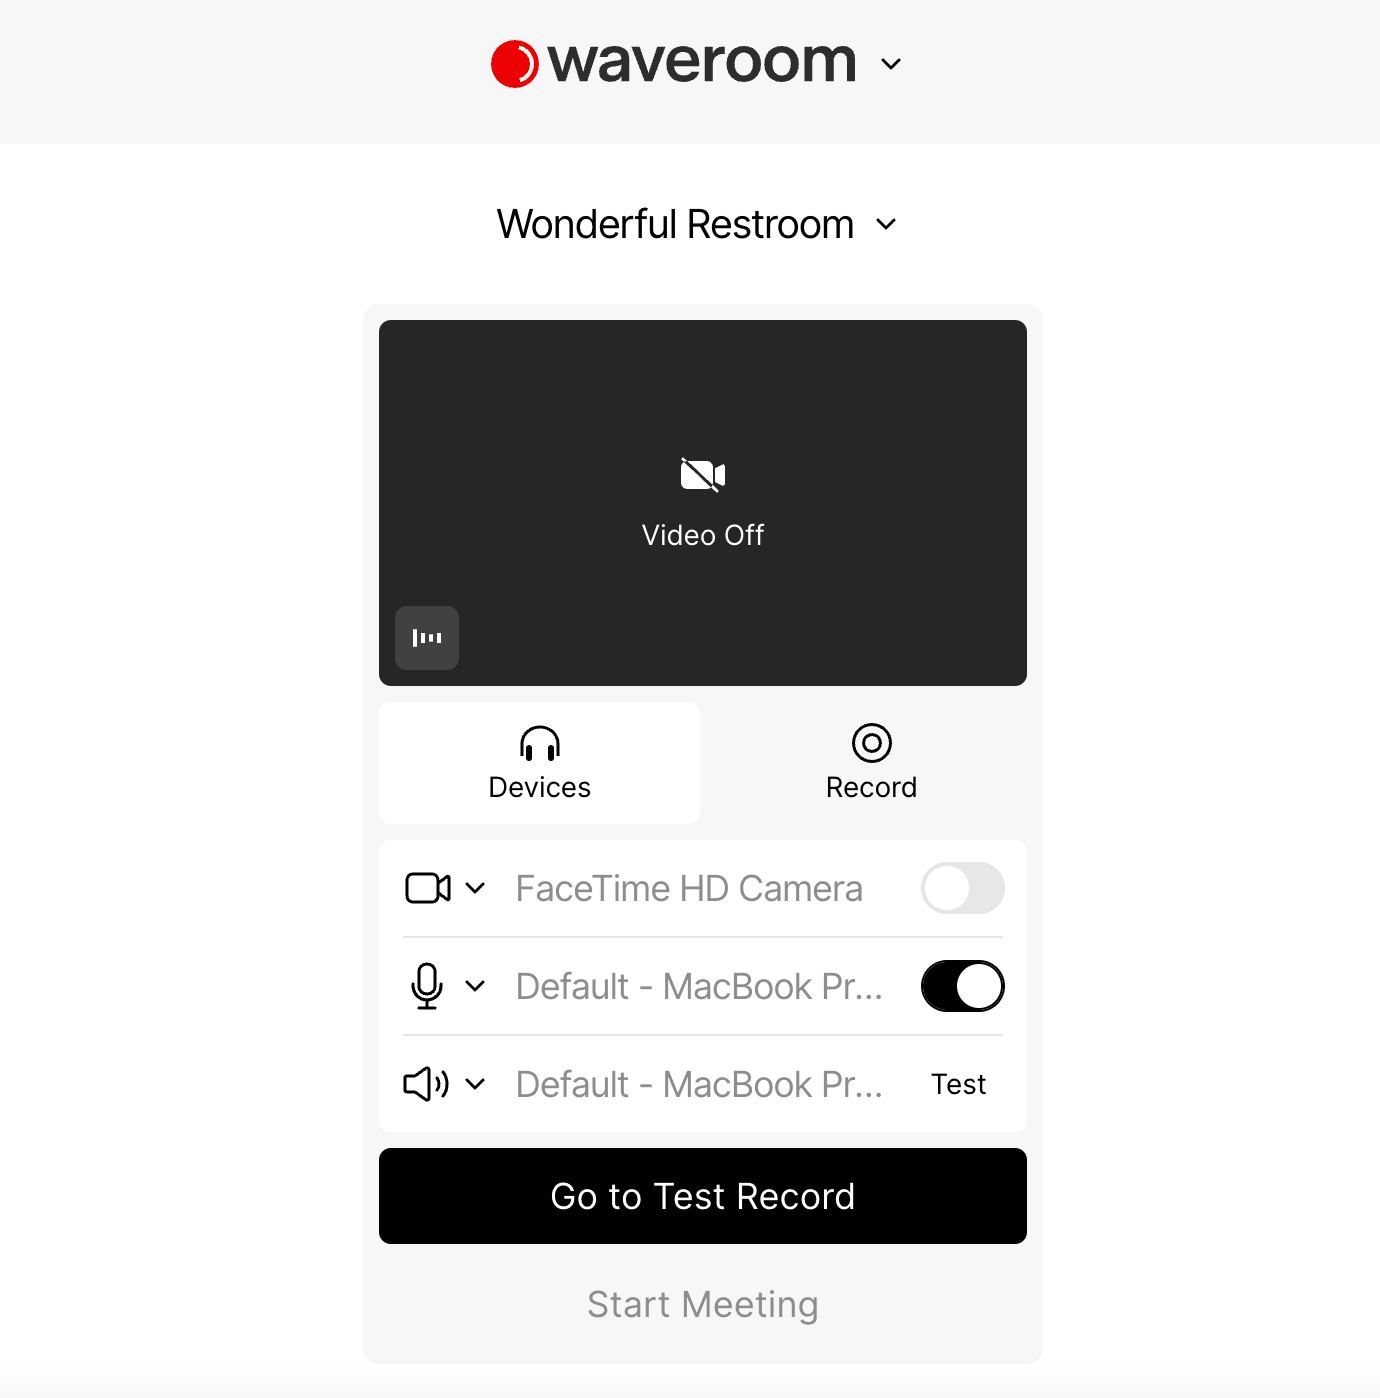
3. Set your Video, Audio, and Record preferences under the video preview in the Devices tab.
4. Click the Go to Test Record button to see how you're going to look and sound, or head over straight to Start Meeting to start recording.
💡You can also invite up to four guests to your Room.
5. Once you've finished the recording, Click Stop Recording.
6. Wait a few seconds while the meeting recording is being saved and press the cross button in the left corner to leave the room.
You will get back to the room that stores all the recordings you've just made, whether audio-only or video. Here, you can play and download the locally recorded video and audio files of each person who participated in the meeting. Waveroom allows for multitrack recording.
If you've recorded a podcast in a noisy environment and some ambient sound has seeped into the recording, follow the remaining steps to cancel it out.
7. Press the Remove Noise button at the bottom of your screen to get rid of noise from all the recordings in the room.
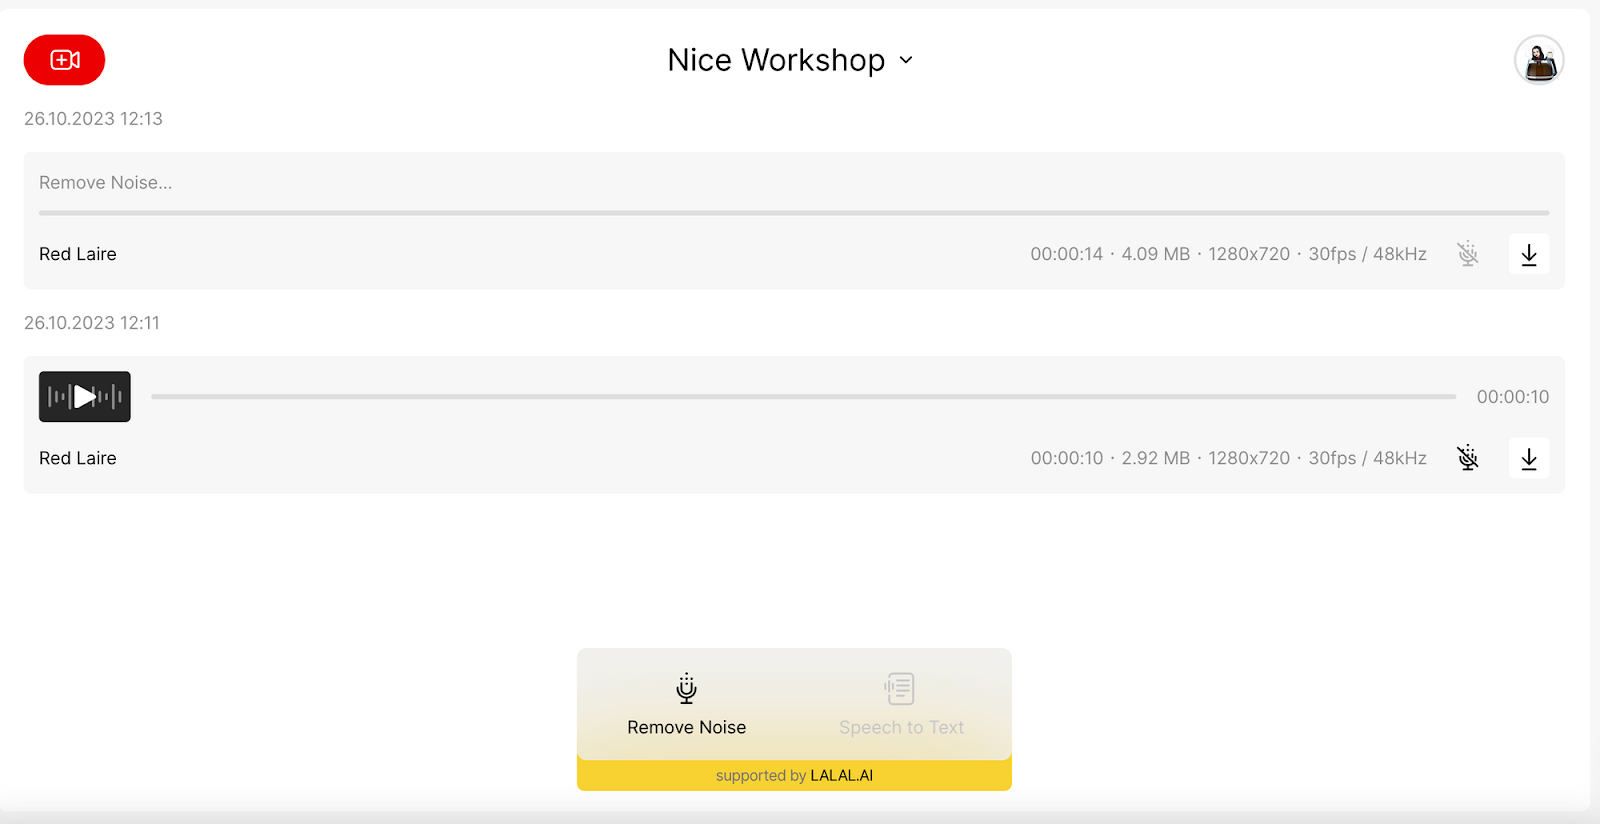
The noise removal feature can be applied to both audio and video tracks.
All the tracks that have been post-processed are labelled with a noise removal icon.
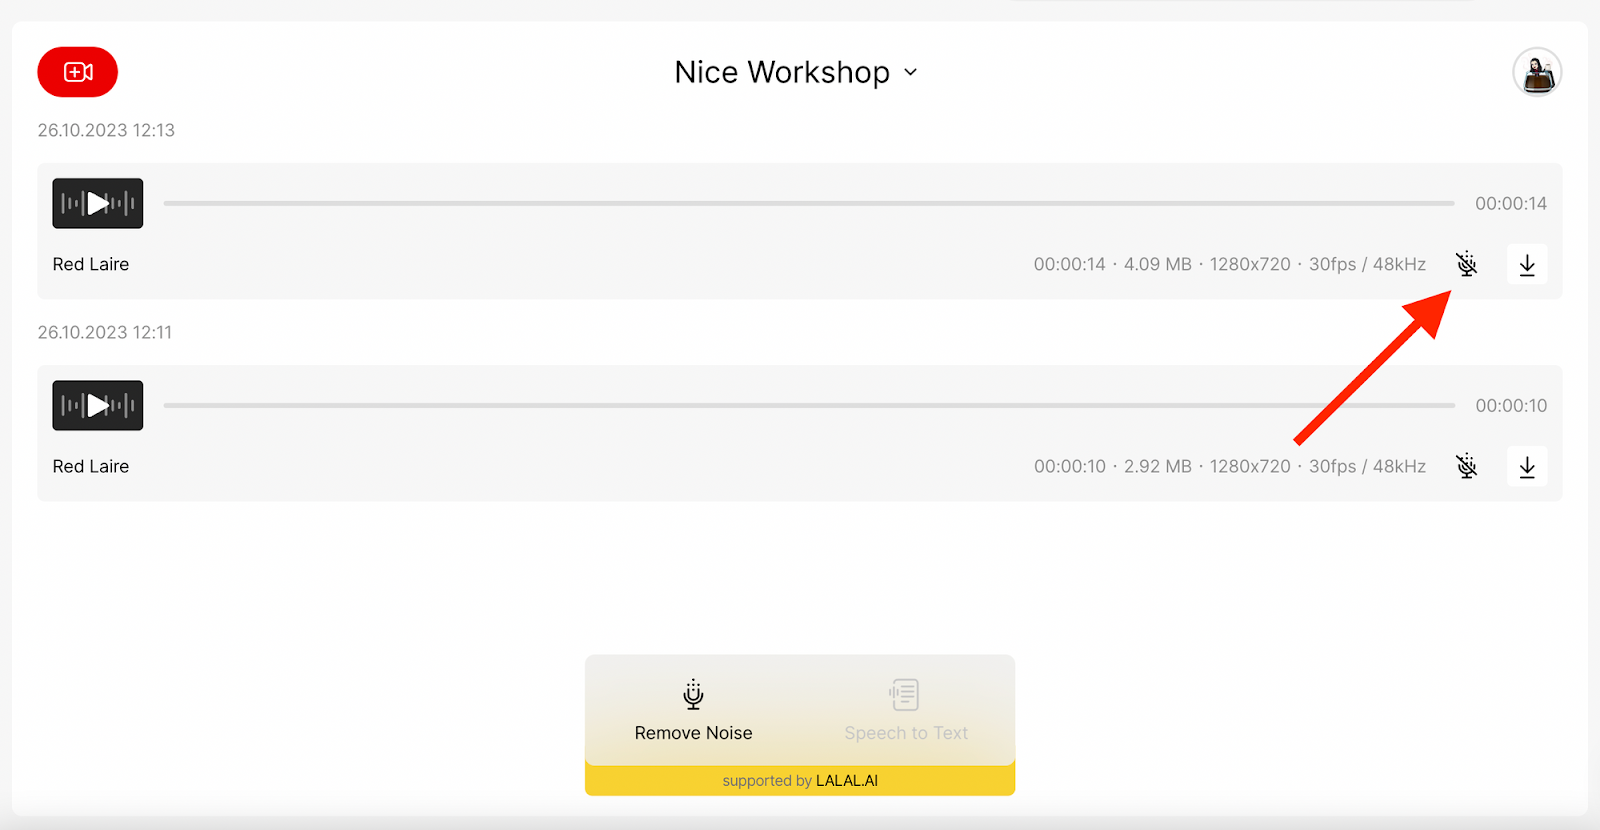
8. Export tracks by pressing the downward arrow icon.
Tips & best practices for setting up and optimising local recording
Local recording setups requires attention to several key factors to ensure high-quality recordings and efficient workflow. Here are some tips and best practices:
#1. Select the right equipment
Choose recording equipment (microphones, cameras, audio interfaces, etc.) that suits your specific recording needs and budget. You should also consider factors such as audio quality, durability, compatibility, and ease of use when selecting equipment.
#2. Optimise recording environment
Set up your recording environment in a quiet, controlled space with minimal background noise and distractions. How? Use acoustic treatments—soundproofing materials, acoustic panels, or foam to improve sound quality and reduce reverberations.
#3. Position microphones and cameras properly
Position microphones and cameras correctly to capture clear audio and video. Use microphone shock mounts or boom arms to minimise handling noise and vibrations and ensure proper lighting and camera angles for optimal video quality.
#4. Adjust recording settings
Configure audio bit rate, sample rate, video resolution, frame rate, and codec selection according to your preferences and requirements and experiment with different settings to find the optimal balance between quality, file size, and compatibility.
#5. Monitor audio levels
Monitor audio levels during recording sessions to prevent clipping or distortion. Use headphones or studio monitors to monitor audio in real-time and adjust input levels as needed to maintain a healthy signal-to-noise ratio.
#6. Test and calibrate equipment
Test your recording equipment regularly and calibrate settings to ensure consistent performance. Use software to check microphone frequency response, camera white balance, and audio levels for accuracy.
#7. Back up recorded content
Implement backup strategies to protect recorded content from loss or corruption. Make duplicate copies of recordings and store them on separate storage devices or in cloud storage for redundancy. Automate backup processes to ensure regular backups are performed automatically.