How to Remove Background Noise from a Podcast Audio
Effective ways to cancel out background noise from audio and prevent it from seeping into your show.

When you're recording a podcast at home, you're likely to pick up background noise. Traffic, animals, fridge, air conditioners, and people talking can add a bunch of unwanted sounds, leading to more editing work. Why is that bad? Background noise is distracting and unprofessional. While your audience might overlook a few minor sounds, frequent interruptions could drive them to switch to other podcasts.
Hence, it's in your best interest to reduce or eliminate background noise in your podcast recordings. And in this piece, we'll show you how.
How to remove background noise if it’s already in a podcast
You can do that with Waveroom, our free online recording studio that, in addition to simply capturing your audio and video, can also remove any ambient noise that seeped into the content. But let's cut to the chase and show you how it's done.
- Log in to your Waveroom account or create it if you don't have one.
- Click Create Room.
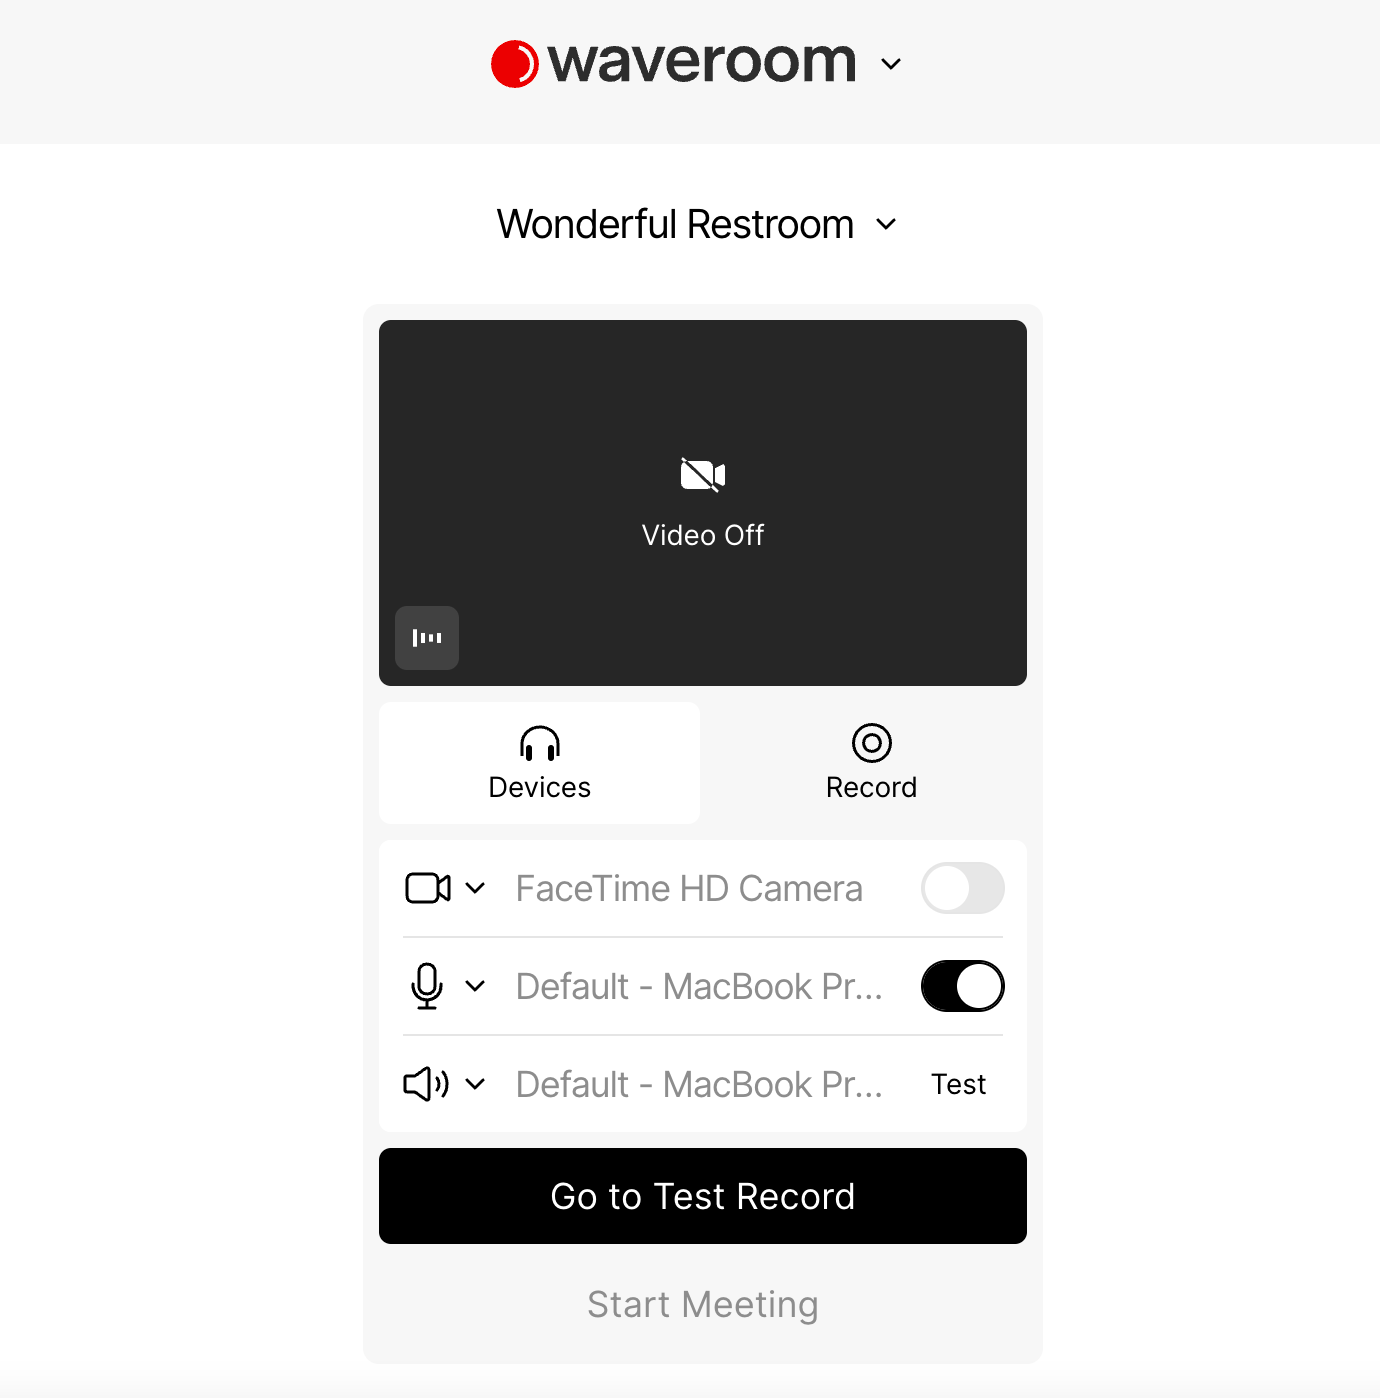
3. Set your Video, Audio, and Record preferences under the video preview in the Devices tab.
4. Click the Go to Test Record button to see how you're going to look and sound, or head over straight to Start Meeting to start recording.
5. Once you've finished the recording, Click Stop Recording.
6. Wait a few seconds while the meeting recording is being saved and press the cross button in the left corner to leave the room.
You will get back to the room that stores all the recordings you've just made, whether audio-only or video. Here, you can play and download the locally recorded video and audio files of each person who participated in the meeting.
If you've recorded a podcast in a noisy environment and some ambient sound has seeped into the recording, follow the remaining steps to cancel it out.
7. Press the Remove Noise button at the bottom of your screen to get rid of noise from all the recordings in the room.
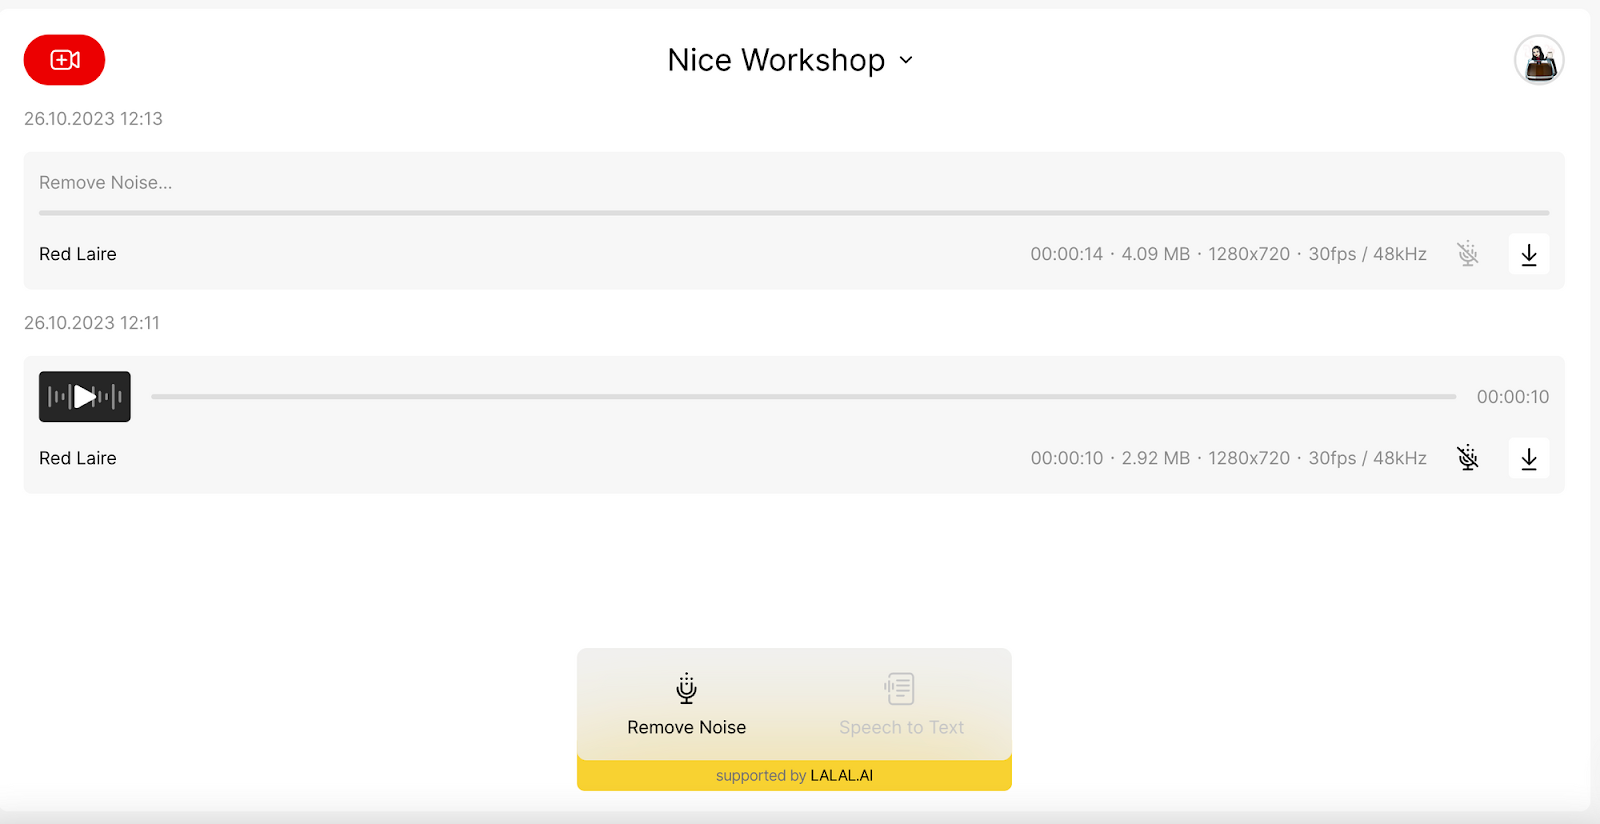
The noise removal feature can be applied to both audio and video tracks.
All the tracks that have been post-processed are labelled with a noise removal icon.
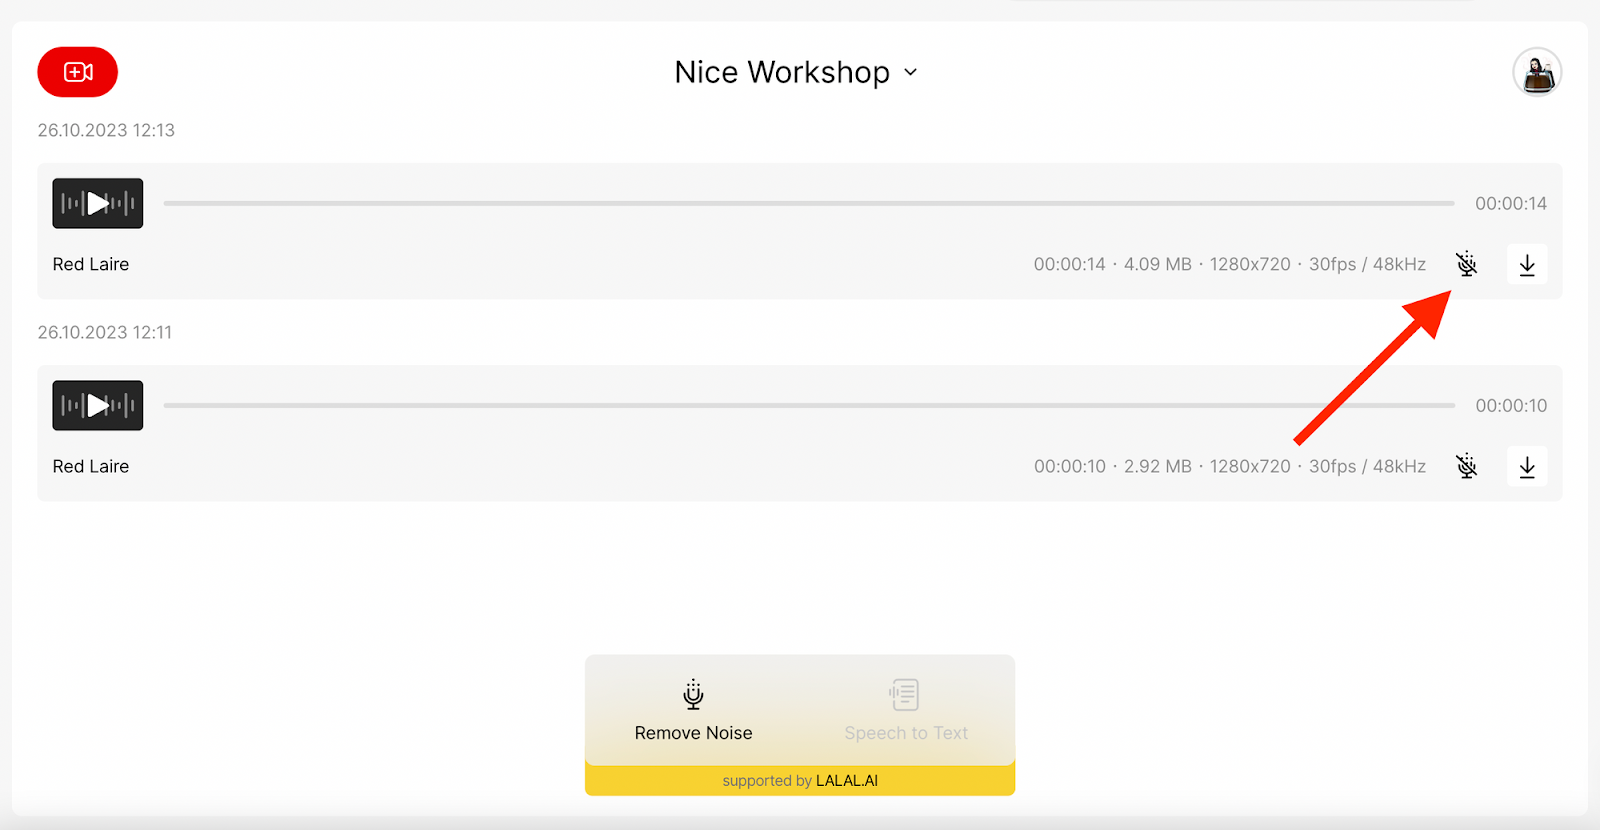
8. Export tracks by pressing the downward arrow icon.
Now your recording sounds just as crisp as it should and even better!
8 ways to reduce podcast background noise
But it’s always better to prevent seeping of background noise than fighting with it. This is why we’re sharing these tips that’ll help you ensure your podcast or interview sounds just as flawless as you've intended it to.
#1. Set up your podcast recording studio
But it doesn't have to be a pro studio with expensive acoustic treatment. An area that acts as your working place or even bedroom without anything extra will do. Put there your setup, such as a laptop, mic, notes, and you'll be fine to record a show from the comfort of your home.
Select a spot in your home or office that is shielded from external noises, preferably an interior space without shared walls with the outside or other active rooms. To minimise reverb, hang blankets, duvets, curtains, or towels that'll work as acoustic treatment. Many podcasters even find their closets to be the optimal recording location, since they're typically small, interior spaces with ample soft materials that absorb echoes, making them a practical choice.
#2. Buy a dynamic mic, not a condenser one
Speaking of the setup, by the way. Condenser mics undoubtedly capture high-quality audio, but their sensitivity extends to picking up all surrounding sounds. Dynamic microphones, in turn, are less prone to capturing environmental sounds, both in terms of frequency and amplitude, as they are more directional.
To minimise the background noise, place your dynamic microphone in a way that it faces away from potential sources of disturbance.
#3. Add acoustic treatments to your bedroom studio
Acoustic treatments eliminate reverb in your recording space, acting as effective tools to block background noise by absorbing and diffusing external sounds. You can add acoustic treatments on your walls and ceilings, place blankets or other soft materials between yourself and sources of noise, and put a reflection shield around your microphone.
To reduce the noise that enters through your doors or windows, purchase rubber hosing or foam seals from a hardware store and place them under your doors or along the edges of your windows. Alternatively, you can hang a blanket over them, ensuring that it fully covers the door or window.
#4. Place the mic away from your computer
You might not be consciously aware of your computer's fan noise throughout the day, as your brain tends to filter it out. However, the fan does generate a significant amount of noise. To minimise this, use a long cable for your microphone and position it across the room from your computer. A simpler solution is to use a reflection shield that encloses your microphone.
More tips to get the most out of your mic:
- Sit back a few inches from the microphone. Don't place your mouth too close to it.
- Place the mic even with your mouth.
- Keep a pop filter between your mouth and the mic.
- Don’t change the distance between yourself and the mic when recording. When you move closer to it, the sound becomes louder. And if you move away, your voice sounds quieter, which you’ll need to level during the post-production to make it sound consistent throughout the show.
- Try to inhale quietly.
- Don’t move things on your desk. Some mics can be too sensitive and capture such sounds as well.
#5. Turn off any notifications, push sounds, and devices
Turn off any noisy elements in the room, no matter how faint the sound may be. Assume that if you can hear it, your listeners will too. So, all phones, messengers, air conditioners, heating stuff, chiming clocks, etc. should be off during the recording. You'll save yourself hours of post-production.
#6. Mute those who aren’t speaking
If you don’t want to cut out not only your coughs but someone else’s as well, mute those who aren’t to speak at any given moment. If your podcast recording software doesn’t allow you to mute guests, ask them to mute themselves while they aren’t speaking. Thus you won’t need to edit the recording to get rid of their voice, setup adjustment or other background noises.
In fact, this applies to you as well. When you aren’t speaking, mute your microphone too.
#7. Wait a bit
If you hear any background noise while recording, merely pause for a few moments until the noise fades away; then resume from the sentence before the interruption—you can edit out the noise later during the editing process.
While it might add a bit more work, attempting to isolate and remove background noise without affecting your voice is much, much more challenging.
#8. Add some background music
If you can't completely eliminate all background noise from your podcast recording and are unable to remove it during editing, add some subtle background music into your episode's audio. This can cover up the background noise and could be enjoyable for your listeners.